Posts

Showing posts with the label how to

How to Remove Google Account in Browser, Android, and iOS

Google accounts are essential for accessing various Google services such as Gmail, Google Drive, and Google Calendar. However, there may be times when you need to remove a Google account from your device. Here's a tutorial on how to remove Google account in browser, Android, and iOS. Removing a Google Account in Browser Step 1: Open the Google homepage in your browser. Step 2: Click on your profile picture, located in the top right corner of the screen. Step 3: From the dropdown menu, click on "Manage your Google Account." Step 4: Click on "Security" in the left-hand menu. Step 5: Scroll down to the "Signing in to other sites" section and click on "Manage third-party access." Step 6: Click on the app or service that you want to remove access to your Google account. Step 7: Click on "Remove Access." Step 8: Click on "OK" to confirm that you want to remove the app's access to your Google account. Removing a Google Accoun

Install Stock ROM on O+ 8.37z

Image
So here's the working O+ 8.37z , tried and tested on my own O+ 8.37z . Some have tried flashing the O+ 8.37 but experienced boot loop or soft brick on their device. Here's the Step-by-step instruction on flashing stock rom on your device. Download: SP Flash Tool O+ 8.37z Stock ROM Step 1: Extract the   O+ 8.37z Stock ROM   from the zip folder. Step 2: Open the SP Flash Tool, choose the scatter-loading and look for the extracted folder of   O+ 8.37z Stock ROM   and choose the  MT6572_Android_scatter file. Step 4: On the  SP Flash Tool   choose the Download Option. On the Drop down option, Choose whether Download Only, Format All + Download or Firmware Upgrade. If your phone got infected by virus choose the Format All+ Download to install a fresh stock rom. Step 5: On   SP Flash Tool   click the download to start the Flashing. Step 6: Turn off your mobile phone and plugin the cable while holding the Volume Down Button , if the flash started releas

Get Rid of Youtube and Web Ads or Pop up ads

We all know that ads were annoying especially the pop up ads. Now there's a solution on how to get rid of any web or youtube ads. Chrome: Step 1: Go to Chrome menu. Step 2: Go to More Tools. Step 3: Got to Extensions. Step 4: Drag down and Click Get More Extensions . Step 5: Search Adblock Addons and install. For Android: Download Adblock Application and use it as default browser. Get rid of youtube and website app and enjoy surfing!

How to Restore Deleted Files on SD or Flash Drive

Before doing this make sure that the SD or Flash Drive you wish the file to restore has not yet any files added or has not yet format. First Step: Insert the SD or Flash drive on your computer or laptop. Check the drive location of your device, whether the drive is (G:) (D:) or (E:) or (F:) Second Step: Open the command prompt by typing CMD on the search in Start Menu and run as administrator. Third Step: On the command prompt type the  attrib -h -r -s /s /d g:\*.* replace the g:\ of the prescribed drive location of your device. Fourth Step: After the process check the files on your SD or Flash Drive, the files might be inside the folder with no details on it. That's it! Comment below for further questions.

How to install custom rom on Xperia SP

Warning: This could be risky and might brick your phone, do this at your own risk. Before installing custom ROM, your phone must be rooted. How to Root Xperia SP Step 1. Download Towel Root , make sure you are connected on the internet. Step 2. Once you are rooted, download CWM Recovery for Xperia SP Extract the Zip > Open Folder > Connect you phone and turn on the USB debugging on developer mode > run the install.bat inside the folder, make sure to run as administrator > Follow the instruction Step 3. Your Phone has now a CWM Recovery which you could install custom ROM Step 4. Download Cyanogenmod for Xperia SP choose the nightyl version of cyanogenmod. Step 5. After downloading the custom ROM, copy the zip folder to your SD card. Restart your phone > After the Xperia SP logo, press and hold volume up to go to recovery mode > on recovery mode choose the "update from zip" and locate the zip folder on you SD card then Update

How to Install Custom Rom on Huawei G610-u20

Image
WARNING:  I am not responsible for whatever happen to your phone, use it at your own risk. This is a step-by-step tutorial on how to install custom rom. I've already tried and tested this step on my own Huawei  G610-u20 Step 1: Download and Update  Recovery Stock Remover .             Put the Dload folder with the UPDATE.APP file inside into SD Card. Step 2: Turn off your mobile device. Step 3: Turn it on by pressing DOWN VOLUME KEY + UP VOLUME KEY simultaneously and                   press POWER key. Release POWER KEY after the vibrate. The phone will install the                         UPDATE and reboot. Step 4: Place  CWM Recovery  to your SD Card and Flash it using Mobile Uncle App Tools then                     reboot into recovery. Step 5: If the mobile device turn into CWM Recovery the Flash Recovery was Successful. Installing Custom Rom Step 6: Download  Custom Rom  for Huawei G610-U20 and put it into root of your SD Card. Step 7: T

How to avoid ISP Data CAP / Android free VPN

Image
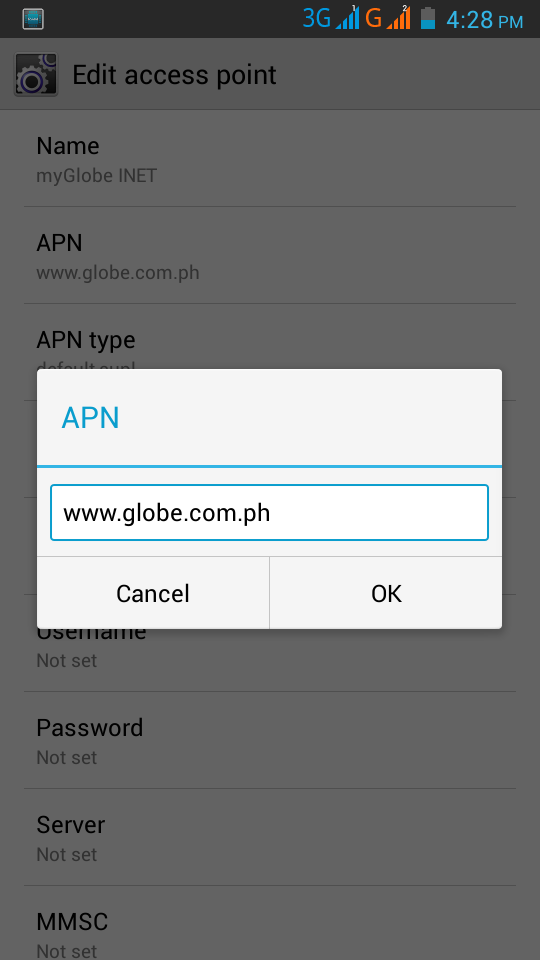
Here's the step on how to avoid data cap limit by ISP. Setting up VPN Step 1: Go to Settings > Mobile Networks > Access Point Names > Choose your operator and do the setup same on the screenshot. Globe APN: www.globe.com.ph Smart APN: www.smart.com.ph Step 2: Install Psiphon App  and setup same as in the screenshot. Host Address: 203.177.42.214 Port: 8080 Step 3: Turn on your mobile data connection and start the psiphon. Here's the sample speedtest using psiphon. It's not very fast as you expected but you can download as much as you can, there's no limit on your data.